Baking secrets and inspiration

Monday 26 October 2020

Halloween Baking | Get the kids in the kitchen this half term

 This year is going to be completely different to any other Halloween we have ever experienced. No kids trick or treating and knocking on their neighbours doors for sweets and chocolate, no reason to decorate your house with carved pumpkins to encourage the knocking (or switching off all the lights and pretending you aren't home either...). 

So, what can you do to make Halloween more exciting for you and your kids? Dress up at home, decorate the house inside and have a party as a family. And what does every party need? CUPCAKES! 


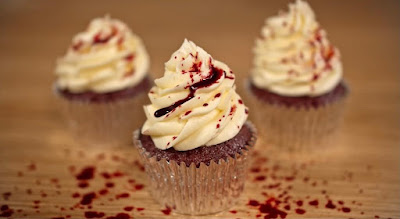
The easiest way to make any cupcake gory and Halloween-worthy is with red food colouring. Be careful, it can get messy (that red food colouring in the video has never 100% come out of my wooden dining table...) but it's totally effective. To make your food colouring the right consistency, you may need to add a little water, then use a pipette or spoon to drizzle on the top of the cake. These are red velvet cupcakes for that extra bloody-ness. 


How cute are these little guys? And so simple to do too. Add a swirl of buttercream icing to the top of a vanilla cupcake using a Wilton 1B tip and then add these eyes from Hobbycraft. 


These ones use a Wilton 4B decorating tip, and just add a little orange food colouring to your icing, sprinkle with skull sprinkles, which I have sprayed with edible silver spray paint and then topped with spider cake toppers on toothpicks. You can make these from scratch with your kids by cutting out eight thin spider legs and gluing them to the centre of small black tissue paper balls (you can buy these from Amazon, Hobbycraft or even Etsy. 

These are just three REALLY SIMPLE cupcake ideas that you can do together with the kids this Halloween. But if you don't want to get busy in the kitchen, then drop me a message to order your Halloween cupcakes, ready for collection on the morning of Saturday, 31st October. 

SHARE:

Friday 23 October 2020

RECIPE | Dog Birthday Cake

 It's my beautiful baby boy's 1st birthday today - I can't believe how quickly the time has flown and he is already a year and no longer a puppy (although every other time I call him, I call him puppy - will have to re-think that one). 

What more to do on your dog's first birthday than make him a birthday cake! When looking into what I could include, there are so many things that are dangerous for dogs to eat, from the obvious chocolate and raisins, to xylitol which is a form of sweetener used in replacement to sugar in some cooking. The only sweetener in this recipe is honey, so although humans can also enjoy the cake it won't be as sweet as you are perhaps used to. 

We have really spoilt him for his first birthday, which may seem silly to some but he is our baby boy and he deserves it. Rolo is the best money we have ever spent, he has brought us so much joy particularly in a time when a lot of people are feeling isolated and depressed. He has encouraged us to go out on daily walks, getting us out of the house perhaps at times when we really just couldn't be bothered, he's made us laugh with his funny waddle and playtime. So, we thought we would treat him with his very own birthday cake!


Even if I wasn't a baker, I would say this recipe is super easy to whip up. And it's baked just like a regular cake but with ingredients that are safe and good for your dog, and has tastes that they love. 

Peanut Butter

When sourcing your ingredients, the only watch out is make sure that the peanut butter you choose is smooth and does not contain xylitol. Most that you find in the regular supermarket don't, but some do so just double check that ingredients list as xylitol is harmful to your dog. 

Keeping the leftovers

Although the cake is only a small 6" treat, you don't want your dog eating it all in one go! Wrap well in cling film and it will last for 3 days in the fridge, or wrap slices individually and pop them in the freezer to get out at a later time. Just let it defrost as room temperature until soft. 

Peanut Butter & Carrot Dog Birthday Cake

Servings: 12

Ingredients

  • 2 Eggs 
  • 60ml Sunflower oil 
  • 115g Apple sauce 
  • 70g Peanut butter (with no xylitol) 
  • 145g Grated carrot 
  • 2tbsp Honey 
  • 145g Self-raising flour 
  • 1 1/2 tsp Baking powder 
  • Additional peanut butter and dog treats for decorating 

Method

1. Pre-heat oven to 180°C, and butter and line two 6" round tins with grease-proof paper. 
2. Add the sunflower oil, apple sauce, peanut butter, carrot and honey to your bowl and whisk together until smooth. 
3. Add the flour and baking powder and fold until combined. And as easy as that - split the batter between your two tins. 
4. Bake for 30-35 minutes or until bouncy to the touch (you can also insert a skewer and when it comes out clean, it's baked). Once slightly cooled, turn onto a cooling rack. 
5. Once completely cooled, stack the two sponges on top of each other using peanut butter in the middle and decorate as you wish. 
6. Serve a slice to your fur baby and celebrate. Keep the rest in the fridge for up to three days and freeze to give as a treat in the future. 
SHARE:

Wednesday 21 October 2020

What is the difference between a cupcake and a fairy cake?

 A debate that has gone on for years in many households (including my own growing up), but they are different things - promise!

You would be forgiven for thinking that fairy cakes are just the English version of a cupcake, typically America, but when you get down to it, the differences mount up.


1. Fairy cakes are smaller than cupcakes
When visiting any supermarket, this should be obvious when you go down the home baking aisle and you can easily find different sized cases for both fairy cakes and cupcakes.

2. The toppings are different
A fairy cake is drizzled with a runny royal icing and let to set with perhaps a few funky sprinkles (or made into butterflies, and we will come onto this later). Cupcakes are a lot more fun and creative (in our opinion!). You can pile them high with buttercream and top with a vast range of decorations including fruit, meringue kisses, truffles, sparkles, glitter dust, sauce - anything you can think of really!


3. Cupcakes can have fillings!
When I am making cupcakes, most of the time I cut out the centre and add a little surprise. Maybe a little chocolate, or salted caramel sauce to give a zingy addition. It just adds yumminess and theatre! It does mean that cupcakes are more premium and this is always reflected in the price....


4. Fairy cakes can have wings
Traditionally, the centres are cut out of a fairy cake and filled with jam or buttercream. The cutting from the middle can be cut in two and positioned in a way on the buttercream to make them look like fairy wings. Probably the fairy cakes that you associate with your childhood
SHARE:

Sunday 18 October 2020

RECIPE | G&T Cupcakes

 These aren't just some ordinary cupcakes! Who knew that the nation's favourite tipple could be converted into a cupcake? The first time I made these was for a Macmillan coffee morning at work to add a little extra buzz and excitement around the event and they hardly lasted five minutes! So, I kept making them, for parties, friends birthdays and the requests just kept flooding in. I have developed the recipe and the decoration over the past couple of years and thought I'd let you all in on the secret. 


Putting gin into a cake batter is a bad idea, the alcohol will be cooked off during the process and you won't get the distinctive flavour that you are after. However, tonic works perfectly in the batter, adds a slight fizz and means that you batter is super smooth. But top those cakes with a pipette full of gin and you're onto a winner. That means that you can squeeze as much or as little gin as you like into the cake (for an extra kick, add a little gin to your icing too!). 


Top Tip
When making alcohol cupcakes, remember that as the alcohol can be cooked off during baking, add the alcohol once the cupcakes are baked and warm fresh out of the oven - just like a lemon drizzle cake. The pipette is the best way of adding the fantastic flavour that you love, and also gives you the choice on strength. 


Gin & Tonic Cupcakes (makes 12)

Ingredients 
For the cupcakes:
  • 175g Unsalted butter
  • 175g Caster sugar 
  • 175g Self raising flour 
  • 25g Plain flour
  • 2 Large eggs 
  • 1tsp Baking powder
  • 1tsp Vanilla extract 
  • 4tbsp Tonic water 
  • Gin for soaking/drizzling
For the icing: 
  • 250g Unsalted butter (block)
  • 500g Icing sugar
  • 100ml Tonic water
  • 50ml Gin 
  • 1 Lime 
  • 12 small cupcake pipettes 

Method
  1. Pre-heat your oven to 180°c fan and line a cupcake tin with 12 cupcake cases. 
  2. Place the butter and caster sugar into a bowl and whilst (with an electric whisk or stand mixer if you have one) on a high speed setting until light, fluffy and creamy.
  3. Add the eggs one at a time along with the vanilla, mixing well in between each addition so that you get back to the light and fluffy texture. Then, add the flours and baking powder in one go. Fold the flour mixture until all ingredients are fully combined. 
  4. Add the tonic water and stir in. 
  5. Fill your cupcake cases to ⅔ full and bake for 15-20 minutes until the cake bounces back to the touch (if you're not confident, insert a skewer and if it comes out clean, your cakes are done!)
  6. When the cupcakes are still warm, remove them from the tin to cool completely and spike them multiple times with a fork. Use a pastry brush to brush gin over the warm cupcakes so that it soaks into the sponge. 
  7. For the buttercream, allow your block unsalted butter to come to room temperature and chop into cubes before mixing on high speed until creamy. Then add your icing sugar and half of your tonic water. Build up the speed until your on high and add a little more tonic if it's too stuff. The buttercream should be super smooth but strong enough to hold its shape when piped. 
  8. Pop a piping nozzle (star shape is the one used for the image, but you can use any for different patterns) a the bottom of your piping bag and cut the end off so that it sits snuggly. Then, fill with your buttercream and pipe a generous swirl onto each cupcake and add a small wedge of lime (your wedges should be small enough to get 12 out of one lime). 
  9. Fill each pipette with your gin of choice and pop these into the opposite side of the cupcake icing to your lime. 
  10. Finally, tag me in any pics and enjoy your little cupcakes of heaven. Can't wait to see your creations!
You can also buy G&T cupcake baking kits here. The kit includes everything you need apart from the eggs including nozzles and piping bags. 

SHARE:
Blogger Template by pipdig